*This product is no longer available. Please contact us for an alternative solution.
The Superhead first flush filter system comes already assembled with the outlet configured to the side.
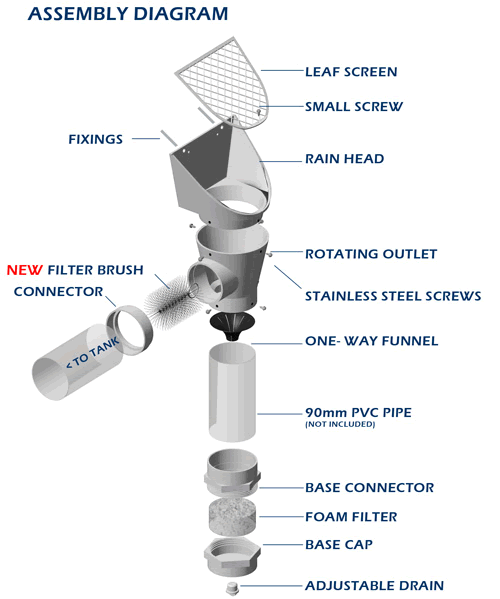
If another location is required simply unscrew the stainless steel screws and rotate to the required position.
![]()
All connections are to 90mm Pipe or 3″ Pipe. Connecting the flush pipe to reticulation.
Method 1: Standard Poly Pipe
The drain fitting is a standard 15mm fitting commonly used in reticulation fittings. Simply connect a 15mm threaded fitting with a 13mm/ 19mm barbed fitting on the other end. This can then be connected to 13/ 19mm poly pipe and directed to wherever is required.
Flow is regulated by the foam filter inside the Superhead Base Cap. A valve or dripper can also be added to the reticulation pipe if required.
Method 2: Micro Fittings
Use a drill to make a 4mm hole anywhere in the base cap. Use a micro threaded joiner to screw into the hole. Connect micro piping to the joiner and direct to wherever is required. A dripper can also be added to the pipe if required.
Installation Instructions
- The Superhead may be installed in a variety of situations. Please click here to view some different options for various rainwater harvesting systems. Select a location to install the Superhead somewhere between the downpipe(s) and water tank inlet. It can be mounted to the wall or directly to the side of some tanks.The rear outlet of the Superhead should be above the maximum water level of the water tank and there needs to be clear room under the Superhead for the first flush pipe. The unit will also drip for several days after rain so it should be positioned over a drain/ garden or pot plant, or connected to reticulation fittings.
- If required, rotate the side outlet so that the side outlet face the rainwater tank and secure using the small screws provided.
- Cut a length of 90mm pipe (larger pipe and adapater can be used if preferred) so that it is around 100mm shorter than the distance between the bottom outlet and the ground. Use pipe cement or silicone to glue the pipe in to the bottom of the Superhead and secure with the small screws provided.
- Insert the ball into the pipe so it can roll freely.
- Use pipe cement or silicone to glue the base cap on and secure with the small screws provided.
- If you intend to paint the unit, now is a good time so you can reach all the hard places.
- Position the unit in the correct location. Mark and drill the 2 holes at the top of the Superhead to secure the unit to the wall or tank. Insert the wall plugs (if required) and fasten the Superhead to the wall with the large screws provided.
- Measure, cut and connect the pipe from the Superhead outlet to the tank inlet. Use the adapter if required.
- Secure all pipes using pipe brackets.
- Adjust the drainage plug on the first flush pipe so that it drips at around 1- 2 drips per second, or if connecting to reticulation fittings, attach the pipe and valve now.
Maintenance
The Superhead requires very little maintenance as the leaf and insect screens are self- cleaning, however it is important to check it occasionally to ensure it is operating properly. Over time the flush pipe can become filled with dirt and obstruct the drain. If it does become blocked, simply unsrew the drainage plug and allow any dirt to be flushed out before replacing the plug.
If you have a lot of fine, floating debris then it may reduce the flow or even block water passing through the insect screen. If you have a secondary filter such as a basket on top of the rainwater tanks then the insect screen can be safely removed.
If you need to clean the insect guard/ filter brush, simply remove the leaf screen by unscrewing the small screw holding it down. Remove the insect guard and clean any debris in the brush.
Specifications
Superhead is designed and owned by Superwall Systems Australia. Product is made in China. Made from uPVC and stainless steel.
Product Code: shrwf-90
Price: $66.00 call 1300 885 547 to get our Cheapest Online Price.
![]()
Im interest in more info about these sistem to incorporated at one habitational project in Panama rep. of Panama, I architect and i find your info, i will need 12 unit for now, can you send me a initial quote include the freihgt to PTY ?
if you have the thecnical drawing in Cad is better to include these sistem in our blue prints.
Regards.
Victor I Arauz
Arqchitect.
Hi Victor,
Thank you for your recent enquiry.
Please refer to your inbox where I have sent you a reply.
Kind Regards,
Theresa